# AppsFlyer Integration
### Step 1: Integrate RZR as a partner
To configure **RZR** as a media partner in **AppsFlyer**, follow these steps:
1. Log in to your [AppsFlyer account](https://hq1.appsflyer.com/auth/login)
2. Navigate to **Collaborate** **>** **Partner Marketplace**.

1. Search for **RZR** in the search tab and select it. You will then move to the Integration page.

**Important:** Please note that the correct account to be searched and selected would be **RZR** and not **RZR Agency**
### Step 2: Activate **RZR** as a partner
1. Click on the **Integration tab**
2. Turn on the **Activate Partner** toggle to activate **RZR** as a partner.

### Step 3: Configure the Integration settings
1. In the **Integration tab,** toggle off **Advanced Privacy** if it is toggled on
2. Enter the Network ID, which RZR’s account manager will provide
**Note:** Please ensure the network ID is entered correctly for both general settings and In-app event settings.

3\. Turn on the **Install view-through attribution.**

4\. For **retargeting** campaigns, please turn on the **Re-engagement view-through attribution.**


For Engaged click/view please both for Install/reattribution ensure that the engaged view click through lookback window and view through lookback window is setup. By default the settings is 2day for all the cases.
To understand how the priority would be present for engaged click/view refer to -
**Note:** For iOS campaigns please ensure that the Advanced RZR Privacy(AAP) is turned off. if AAP is on, user-level attribution data for non-consenting users running iOS 14.5+ will not be available to advertisers or partners.
**Note:** For probabilistic view attribution , please ensure that the client has enabled below settings.
### Step 4: Set up default postbacks to share all the postback data with RZR
In the **Default postbacks** section, select **All media sources, including organic** against **Install (Event Name)** in the **for users from** drop-down.

### Step 5: Activate in-app event postbacks and configure the postback time window
1\. Ensure to turn on the toggle for **in-app event postbacks**
2\. To make sure **RZR** receives in-app event postbacks after key user actions like installs or re-engagements, set an In-app Event Window.
We suggest selecting **Lifetime** to continuously share events that support campaign optimization.

3\. If the event involves a purchase, choose **value and revenue**. For non-revenue events, select **value and no revenue**.

Finally, click **Save Integration**.
Important: For each event, please ensure that ***All media sources including organics***, are enabled to ensure that all the postbacks flow through RZR.
### Step 6: Set up Tracking for User Acquisition and Retargeting campaign
1\. From the same page where you have integrated postbacks, click **Attribution link**. For **Choose your** **attribution link type**, select **Use a** **single-platform link**.

**Note**: For more information on OneLink please refer to this [guide](https://support.appsflyer.com/hc/en-us/articles/115005248543-OneLink-guide?utm_campaign=marketplace\&utm_medium=ui\&utm_source=hq1).
2\. In most cases, the Parameters and Values fields are automatically populated by AppsFlyer, so no manual changes are required.
If there is a need to include additional parameters, click the **Add Parameter** option.

**Note:** Please ensure that the **Retargeting settings** is toggled off for **user acquisition** campaigns.

3. Setting up the click-through lookback window and view-through lookback window. By default, the values are set to the following:
Click through Attribution: 7 days\
View through Attributions: 24 hrs

4. Final step: click **Save attribution link**.
**Note:** CTA / VTA window should be matching click lookback window defined in the attribution link.
**Retargeting tracking link setup**
1\. As a first step, go to **Settings** > **App settings** > **Enable re-engagement attribution**. For re-attribution, keep the setting to the default settings, i.e, 90 days, or you may change it.
2\. Once done, please follow the similar steps mentioned above for creating links for App install campaigns to navigate to the attribution link tab and to set the required parameters for your attribution link.
3\. In the following steps, enable the retargeting settings, which will add the **is\_retargeting=true** parameter in your attribution link. **Add details on Ignore active users**

4. Configure the Re-engagement window to 30 days. You can always change the window, the **\&af\_reengagement\_window=** parameter in the tracking link will reflect the window selected.
**Note:** Once **the Retargeting** **settings** is turned on, this modifies the attribution link by appending `is_retargeting=true` to the URL.
For RT campaigns, ensure the `is_retargeting=true` parameter is always included. Even if the retargeting settings toggle is ON or OFF, the attribution should still function correctly.
**Note**: Please ensure that Re-engagement settings are turned on under overall App settings. Re-attribution can be defined by the client or maintained at a 90-day default window, as per the setup.

### Step 7: Ad Network Permissions
1. Ensure the client has enabled the **Ad Network permissions** so that the app is shared on the RZR dashboard.
2. Toggle on permissions for the listed parameters

Definitions for each permissions request can be viewed here -
**Note:** Please ensure that the **Ad Network Permissions** is turned on to ensure that the app is visible on the RZR dashboard.
### Step 8: Setting up Cost Integration
To enable the Cost API, follow these steps:
1. In AppsFlyer, from the side menu, select **Collaborate** > **Active Integrations**, and select the partner.
2. Click **Manage integration**.
3. Open the integrated partner **Cost** tab.
4. Turn on the **Get Cost Data** toggle. The requirements to connect to the partner display.
5. Configure and authenticate the integration to the partner. The integration method depends on the partner. [Learn more.](https://support.appsflyer.com/hc/en-us/articles/360008850257-Connecting-cost-integrations#connection-methods)
6. If the partner’s cost configuration has **Site ID mapping**, select the desired site ID configuration from the dropdown. [Learn more.](https://support.appsflyer.com/hc/en-us/articles/360008850257-Connecting-cost-integrations#site-id-mapping)
7. Click **Save Cost**.
8. Click **Test Connection.**
Ensure that the correct **API key** is entered in the **Cost API Integration**. It’s often observed that the **Network ID** is mistakenly used instead of the **API token**, leading to cost data discrepancies.
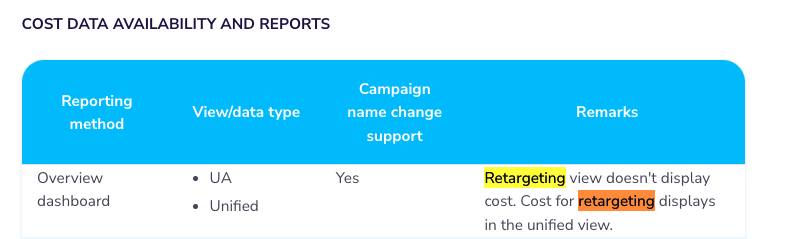
**Note**: The **Retargeting View** in the **Overview Dashboard** does **not** display cost data. The cost for retargeting is available in the **Unified View**.
**Note**: Please ensure that the correct API key is being passed in the cost Integration and test the connection for any error.
### Step 9: Setting up Audience Integration
To create a new connection with the Audience list through AppsFlyer, follow these steps:
1. Go to **Engage** **>** **Audiences > Connections**.
2. Click **+ New connection**.\ **Note:** If you are creating a new partner connection from within the audience builder, click on **+ Add partner connection** within the **Manage audience connections** window.
3. Select a **Partner name**.
4. Enter a **Connection name**.\ **Note:** It must be a new name that was never used when creating other connections.
5. Complete the required fields/login information for the partner. Some partners have [detailed instructions about how to connect.](https://support.appsflyer.com/hc/en-us/articles/360013960577)
6. Select the user identifiers that you authorize for sharing with this partner.
* Supported identifiers vary by partner. Only those identifiers supported by the selected partner will appear in the list.
* Only identifiers that comply with your [account-level user identifier policy](https://support.appsflyer.com/hc/en-us/articles/360016791118-Audiences-user-identifier-policy) will be uploaded. You will see a caution message if you select an identifier that is disallowed by your account policy.

### Advertiser Setup Instructions in AppsFlyer
To enable ad revenue (IAA) data sharing via Data Locker, the advertiser must grant access to UA signals for the DSP partner.
**Step-by-Step Guide:**
1. **Log in** to your AppsFlyer account.
2. In the left-hand menu, navigate to:\
**Collaborate** → **Active Integrations**
3. **Search** for and select your DSP partner (e.g., **RZR**).
4. Go to the **Integration** tab.
* Ensure **Activate Partner** is **ON**.\
⚠️ If this is turned off, no data will be shared.
5. Switch to the **Permissions** tab.
* Enable ✅ **Ad network permissions**
* Enable ✅ **Access ad revenue raw data (UA signals)**
6. In the **Sending Option** section, choose one of the following:
* **This partner only:** Sends ad revenue data only for impressions served by this DSP.
* **All media sources, including organic (Recommended):** Sends revenue data from all sources, even if not attributed to the DSP.
* **Note:** Attribution details for other partners will not be included.
7. Click **Save Settings** to apply the changes.
This document outlines the complete setup details required to configure your AppsFlyer account. Please review each section carefully and follow the outlined steps to ensure accurate tracking, attribution, and reporting.
If you need any help with the configuration document, feel free to reach out to your **RZR Account Manager/Account Coordinator** for assistance.